How to Check Your Bike Engine Oil level: Tips and step-by-step guide
How to Check Your Bike Engine Oil level: Tips and step-by-step guide
Bike Engine
Oil - Riding safe and smart? Checking your motorcycle's engine oil is key! It's the lifeblood of your
engine, preventing costly repairs and keeping you on the road.
Here's why it matters:
1. Friction Fighter:
Engine oil acts like a slippery shield, reducing wear and tear by minimizing friction between moving parts. Think of it as a smooth handshake between metal bits! [Bike Engine Oil]2. Cool Head, Cool Run:
The engine gets hot during those adrenaline-filled rides. Engine oil absorbs and carries away that heat, keeping things running smoothly and efficiently. So, less heat means better fuel economy, saving you money at the pump!3. Quality Counts:
Not all oils are created equal. Using the right type and amount of oil, as recommended by your motorcycle's manufacturer, is crucial for optimal performance and engine protection. Remember, skimping on oil can cost you big in the long run.Make checking your oil part of your regular routine. It's a quick and easy way to keep your motorcycle happy and your wallet healthy!How to check your motorcycle's engine oil level?
It's a simple process that can save you big bucks in the long run! [Bike Engine Oil]Here's a step-by-step guide:
1. Find a Level Spot:
First, park your motorcycle on level ground. This ensures an accurate oil level reading. If you don't have a center stand, you can use a paddock stand or ask a friend to help hold the bike upright.2. Warm Up and Cool Down:
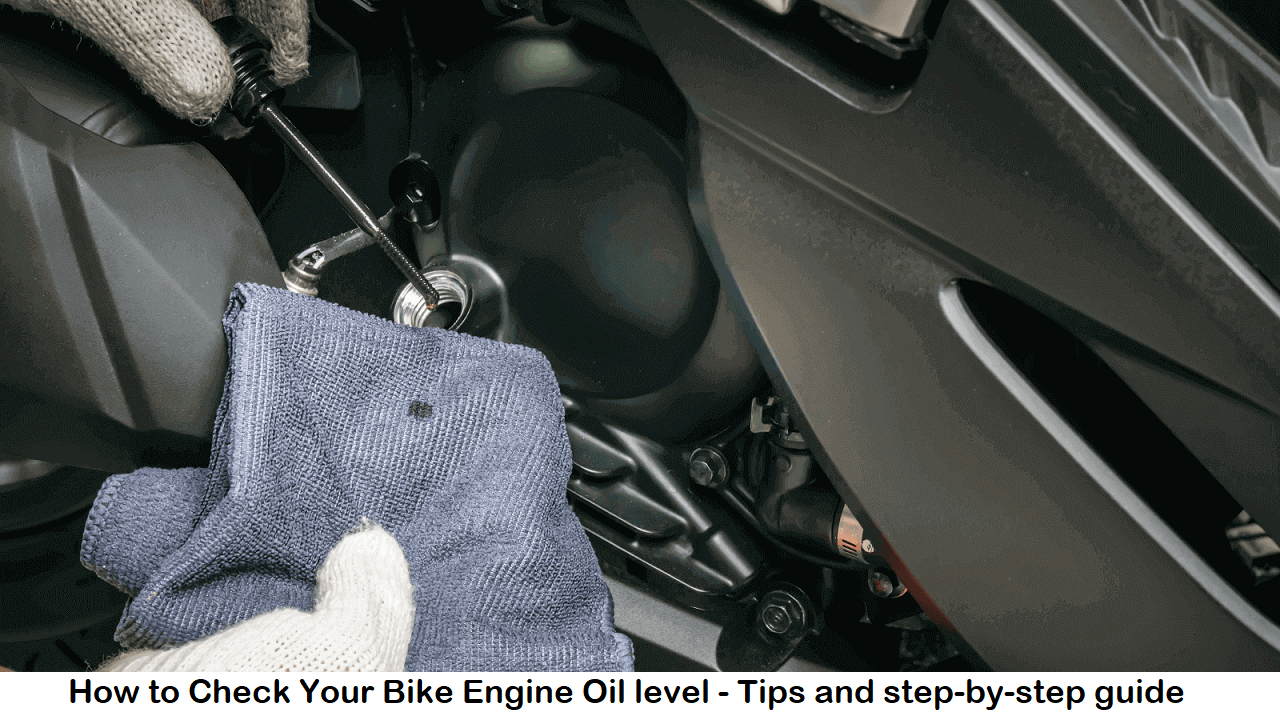
Start the engine and let it idle for a few minutes. This warms up the oil and allows it to circulate throughout the engine. Then, turn off the engine and wait for about 5-10 minutes for the oil to settle.3. Locate the Dipstick:
Most motorcycles have an oil dipstick located near the engine case. It's usually a long, thin metal rod with a loop at the end. Consult your owner's manual if you're having trouble finding it.4. Check the Level:
Pull out the dipstick and wipe it clean with a rag. Then, insert it back into the engine all the way, and pull it out again. Look at the markings on the dipstick to see where the oil level falls. Most dipsticks have two marks: a high and a low. The oil level should be between these two marks.5. Top Up if Needed:
If the oil level is below the low mark, you'll need to add some oil. Use the type of oil recommended for your motorcycle, and add it slowly until the level reaches the full mark. Don't overfill!6. Clean Up and Repeat:
Wipe off the dipstick and put it back in its place. You can now start your motorcycle and ride away. It's a good idea to check your oil level regularly, especially before long trips.Bonus Tip: Pay attention to the color and consistency of the oil when you check it. Dark, dirty oil is a sign that it needs to be changed.By following these simple steps, you can easily check your motorcycle's engine oil level and keep your engine running smoothly for years to come!Check the oil level
Grab the dipstick:
Find that handy metal stick near your engine (consult your manual if you're unsure).Dip and check:
Pull it out, wipe it clean, and shove it back in. This coats it in oil.Eye on the marks:
Look for "full" and "low" lines. Ideally, the oil level sits somewhere in between.Top up or drain:
If it's low, add the right type and amount of oil (check your manual!). If it's overflowing, drain some out (safely, of course!).No mechanic is needed, just you and your dipstick! Keep your engine happy with regular oil checks.Gars Lubricants - Bike Engine Oil
MAGIC 20W-40-SM - BIKE ENGINE OIL
MAGIC 20W-40-SN - BEST ENGINE OIL FOR BIKE
GELCO - BIKE ENGINE OIL - BEST ENGINE OIL FOR BIKE
GASOLINE 20W-50-SG
NEXA BULLET ENGINE OIL
Recent Post
Top Categories
Popular Products